Are you trying to make Google Analytics custom reports, but not sure the best way to go about it?
Google Analytics can be one of the most powerful tools ast your disposal. It helps you understand your audience, track key performance indicators (KPIs) across your site, and it’s totally free to use.
But when you want fast and easy reports, you’ll need to create them custom. For that, we’re going to teach you 2 methods.
First, though, let’s get clear on why you should use Google Analytics custom reports at all.
Why Use Google Analytics Custom Reports?
If there’s one criticism we could level at Google Analytics, it's that it almost provides too much information. It can be overwhelming, especially at first.
The good folks at Google have tried to help us out by organizing the data into different sections. That’s useful when you just want a general overview of your website’s performance. But it’s less helpful for diving deep into your data and uncovering differences in how your various audiences behave.
What if you want to investigate which campaigns resonate most with customers from a specific location? Or see how your blog posts perform without adding in stats from the rest of your web pages?
Well, you’re in luck. Because Google Analytics also offers custom reports you can use to combine different metrics, apply filters, and answer specific questions that matter to your business.
Custom reports let you combine metrics and dimensions from Google Analytics’ standard reports in one place. Instead of relying on broad strokes to analyze your marketing performance, custom reports help you build a more detailed picture of your KPIs.
You also have a little more control over how your metrics look when you build custom reports yourself. You can choose from a small range of visualizations, including line graphs, tables, and maps.
There are some limitations to custom reports that are worth mentioning. Not all metrics and dimensions are comparable, so you’ll sometimes find that you can’t bring everything you want together in one report.
This is down to how Google Analytics collects data. Some metrics are recorded on a user level, some on a session level, and some on a hit level. You can only combine metrics that share the same scope in one report.
Most marketers get around this by creating a variety of reports, depending on the questions they want to answer. But it is just worth bearing in mind as you put your reports together. You may not be able to have everything you want in one place.
So, why choose to build your custom reports in Google Analytics?
Well, one compelling reason is that it is free. It isn’t too tedious to set up new reports once you get used to combining metrics and dimensions to get the data you need. And you can set them up directly in your Google Analytics dashboard.
If all you need are reports that show your website performance and you don’t mind setting up more than one to get everything you need, Google Analytics custom reports should suit you just fine. If you prefer to combine your website KPIs with metrics from your other digital marketing channels, it might not be the one for you.
Setting Up Custom Reports in Google Analytics

Before you start setting up custom reports, I highly recommend taking some time to decide what questions you are trying to answer and why.
It will save you from taking hours to set up reports that don't give you the information you need. Or never get read. The only reason to create a custom report is to meet a genuine business need.
Once you know what the questions are, decide which metrics will help you answer them. Creating a custom report will be much more straightforward once you’ve done this step.
Ok, let’s get your report set up.
In Google Analytics, navigate to the view you’ll be using for this report. It will most likely be your Master view, unless you have additional views set up with relevant filters.
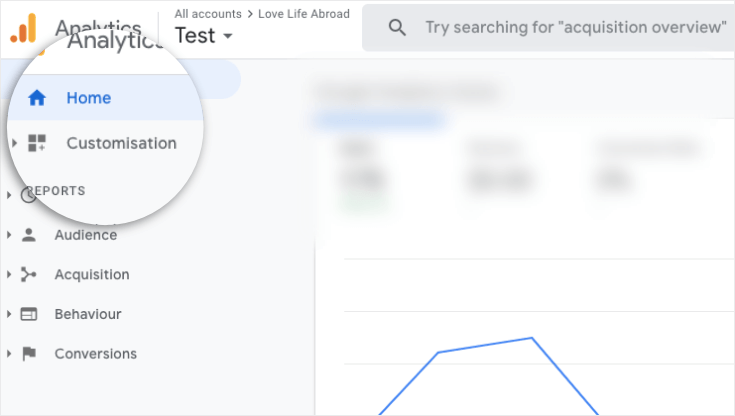
In the menu on the left-hand side, click on Customization. You’ll find it at the top, directly under Home:
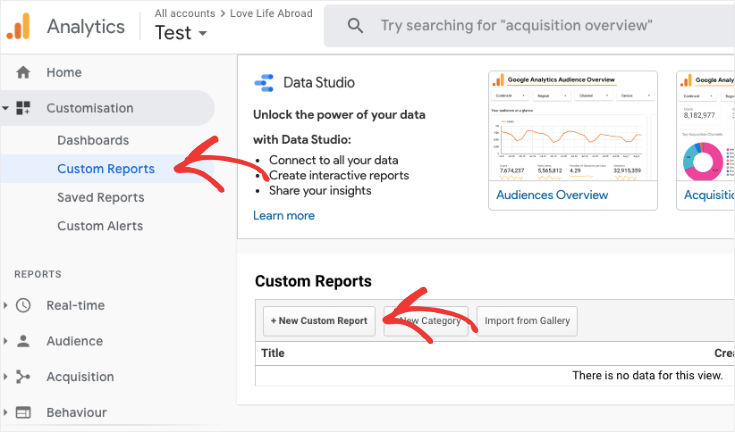
Click Custom Reports and then New Custom Report.
Give your report a name.
This should be short but descriptive. And, ideally, something that will make sense to other people too.
Next, you need to choose which type of report you want. There are three options:
- Explorer: This is the standard Google Analytics report that you will be used to seeing on your dashboard. It has a line graph at the top and a table below. The table is dynamic, so you can do things like search and sort your data.
- Flat Table: A flat table report simply displays a static table. You can sort the data.
- Map Overlay: If you want to see differences in location, this report will show you a heatmap of the world. Darker colors indicate higher levels of whatever metric you are tracking (conversions, users, and so on.)
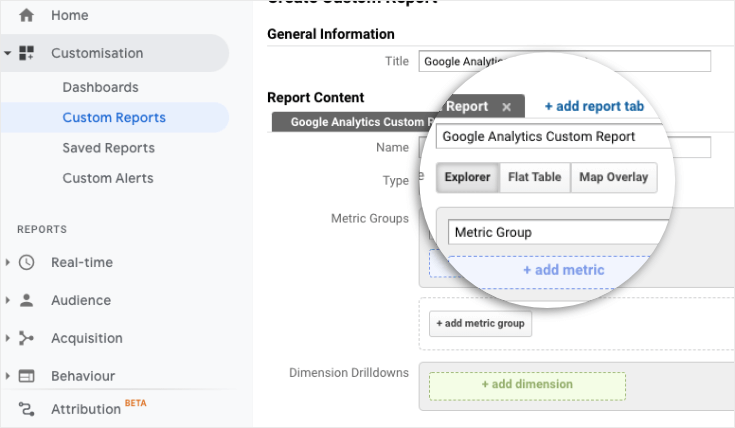
If you want more than one of these in your report, you can do that too. You just need to add additional tabs. Each tab can be a different type, so you could build a report that includes both an Explorer and a Map Overlay, for example.
Next, you will set your metrics and dimensions. This is where the core of your report building comes in.
Dimensions are attributes of your data. Information that can be grouped instead of counted, like city, browser, source/medium, page, campaign, etc.
Metrics are quantitative measures such as users, sessions, goal completions, pages/session, and so on.
You combine them to build your report. Depending on the type of report you chose, you may find some options aren’t available because of how the data displays.
You can also add filters to make your reports even more specific.
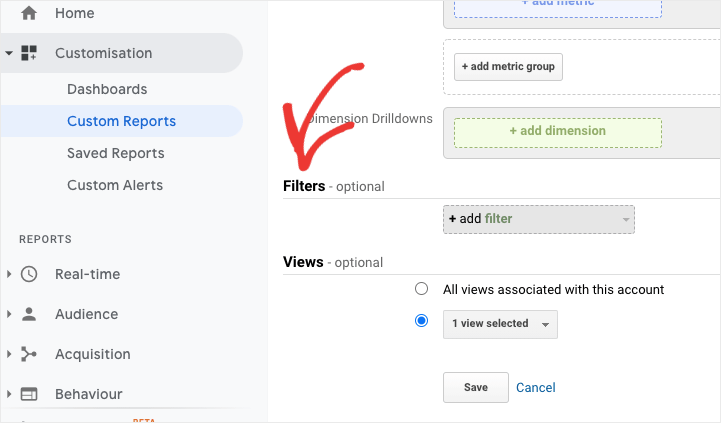
For example, if you are only interested in mobile users, you might add Device as a filter.
It’s worth noting that you can use audience segments as a dimension in custom reports, which is useful for seeing how your different audiences behave once they reach your site.
You can also choose whether this report will be available in just the view you are working in or in all the ones you have set up for the website.
When you have everything set up as you want it, click Save. You should see your report straight away, so this is a perfect moment to check it is appearing as expected.
In the future, you can find your custom reports under Customization > Custom Reports.
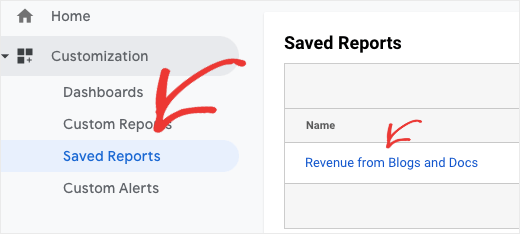
Find the report you want in the list and click on it. This is why naming is so vital, so you can identify the one you need easily.
You can also edit, share, copy, or delete your report by clicking on the Actions button. The share button here gives you a URL to send to colleagues.
You can also export a report or automate sharing by email – you’ll find these options at the top when you look at the report itself. Note that sharing via email sends a PDF attachment, so the data won’t appear in the body of the email.
And you are done. Your custom report is created and ready to go.
As we mentioned earlier, you may want a more comprehensive report that doesn’t just include KPIs from Google Analytics.
Let’s look at the right tool for that.
Google Analytics Custom Reports: Method 2

The second way you can build a Google Analytics custom report is with a tool like Metrics Watch:
Metrics Watch is a report building tool that allows anyone to quickly and easily create custom reports from their favorite marketing channels, including:
- Google Analytics
- Google Search Console
- Good Ads
- Facebook (paid and organic)
- Instagram (paid and organic)
- LinkedIn (paid and organic)
- And more…
This is important because it allows you to combine all of your KPIs into a single report. This helps your team or clients quickly understand what’s working and what’s not.
That way, you can create smarter, data-driven marketing strategies to boost conversions.
We should also mention that Metrics Watch comes with a codeless drag and drop builder. If you’re more of the “creative type” and don’t consider yourself very tech-savvy, that’s no problem.
You can simply integrate the channels you want to pull data from, and drag and drop the metrics into place.
And unlike Google Anlaytics’s native reports, Metrics Watch will send your reports directly via email with no 3rd-party attachments.
That means no more messy PDFs to organize and no more sharing access to your Google Analytics account for clients to see important data.
Instead, you send the KPIs people need directly to their inbox in the most frictionless way possible.
Want to see it in action for yourself? Just click below to start your 100% risk-free Metrics Watch trial today (no credit card required):
Start Your Free Trial Today!And that’s it for today! These have been 2 ways you can create Google Analytics custom reports.
We hope you found this post helpful. If you did, you’ll definitely want to check out the following resources:
These resources will have even more valuable information on how you can use Google Analytics to create more comprehensive and profitable marketing reports.
